


Raspberry Pi
After several months I finally received my Raspberry Pi (Model B).
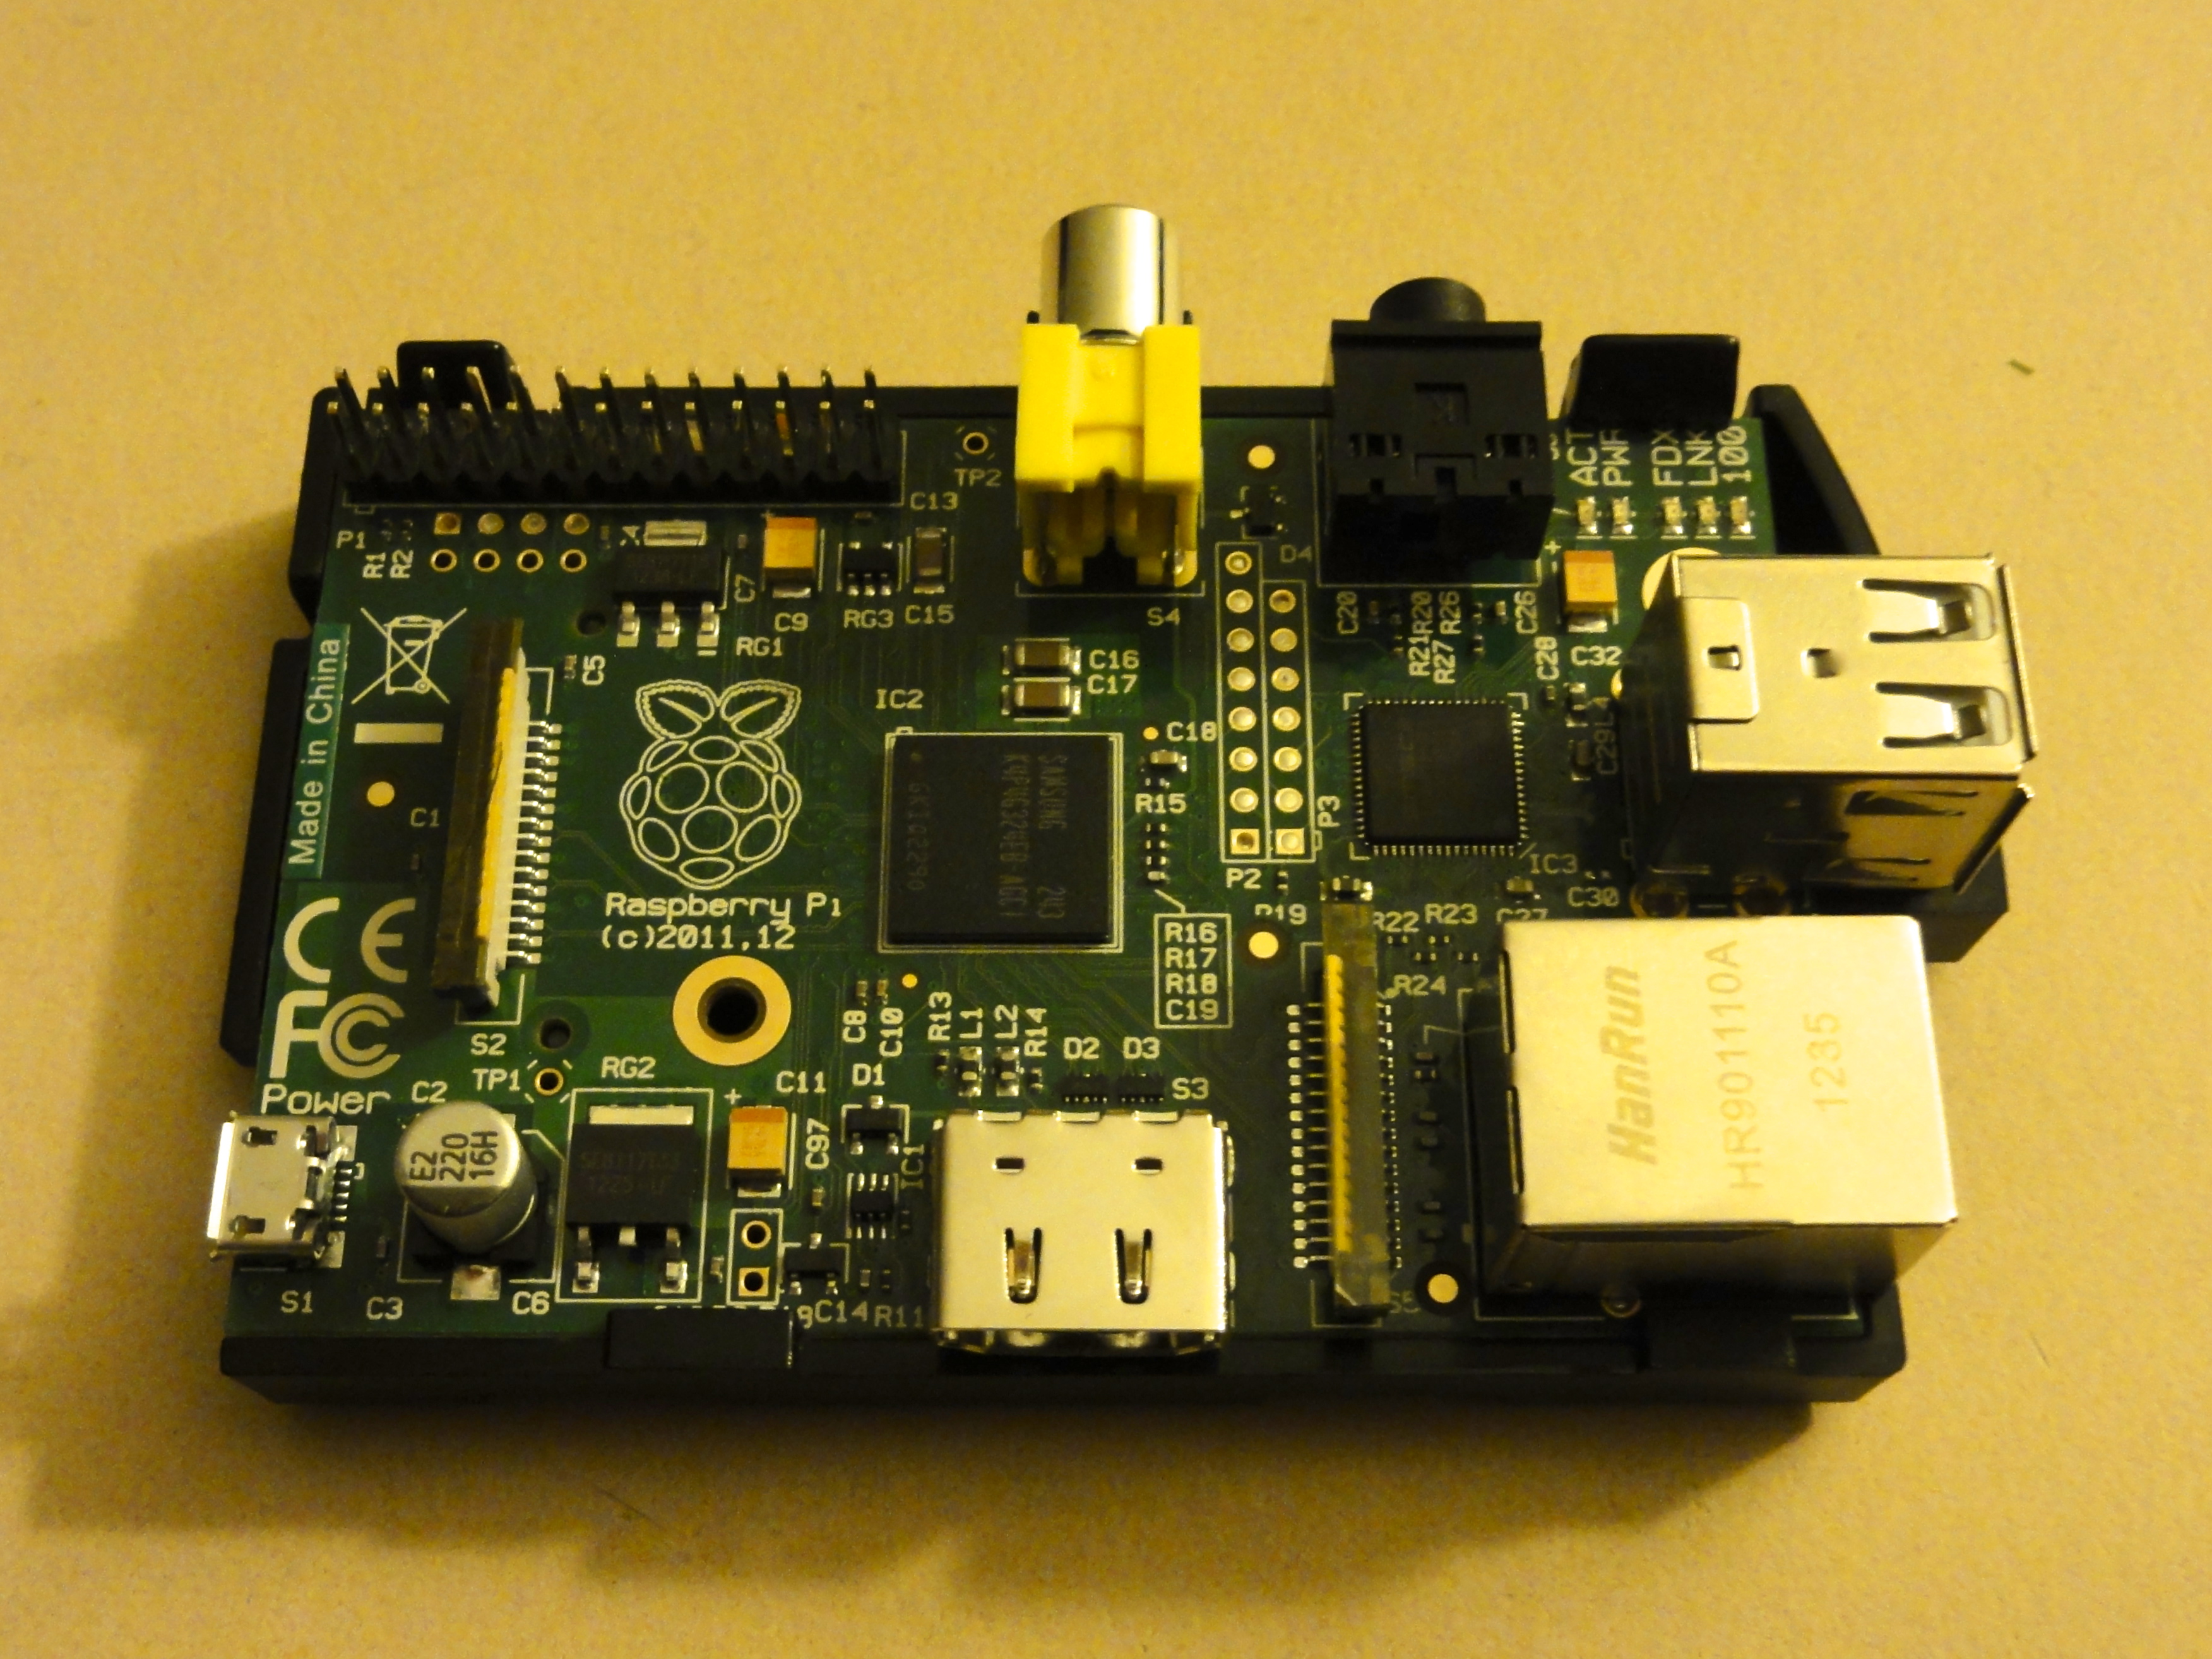
What is a Raspberry Pi? It's a very small size computer (~85 mm × ~55 mm) with very low power consumption (~3.5 W) powered by a 700 MHz ARM CPU (ARMv6 architecture) and 512 MB of memory.
The goal for this computer is to provide a cheap computer for kids to learn computer programming. Being very cheap gave a lot of ideas for other usages… and mine will be HTPC (aka Media Center).
Several operating systems can run on Raspberry Pi, most of them are GNU/Linux distributions. Since the media center capabilities of the Raspberry Pi are quite obvious and one of the best media center software (XBMC) is open source and run on Linux, there are already Linux distributions just for that:
Hardware
- 700 MHz ARM11 CPU
- VideoCore IV GPU (with Full HD h.264 decoder)
- 512 MB of memory
- 2 USB 2.0 ports
- 1 100 Mb/s ethernet port
- 1 HDMI audio/video output
- 1 Composite RCA output
- 1 3.5 mm audio jack output
- 1 SD Card slot (as main storage)
- 8 GPIO pins
Pictures
Price
- Raspberry Pi Model B: 27.40 €
- Case: 5.06 € (not mandatory)
- 16 GB SD Card: ~20 € (you can buy a smaller one or reuse one you already own)
- Micro USB charger: 14.90 € (you probably can use your phone charger)
- MPEG-2 license key: 2.96 € (if you want to decode DVDs for instance)
- Operating System: 0 €
Total: between 27.40 € and ~70.32 €
Apple TV: 109 € (but you can't do anything that is not Apple Approved™)
Installation
I decided to use Raspbmc so I followed Raspbmc installation manual.
First of all, download the installer and prepare the SD Card (I'm doing that from my Mac):
$ curl -O http://svn.stmlabs.com/svn/raspbmc/testing/installers/python/install.py
$ chmod +x install.py
$ sudo python install.py
Raspbmc installer for Linux and Mac OS X
http://raspbmc.com
----------------------------------------
Please ensure you've inserted your SD card, and press Enter to continue.

Enter the 'IDENTIFIER' of the device you would like imaged, from the following list:
   #:                       TYPE NAME                    SIZE       IDENTIFIER
   1:                        EFI                         209.7 MB   disk0s1
   2:          Apple_CoreStorage                         239.2 GB   disk0s2
   3:                 Apple_Boot Recovery HD             650.0 MB   disk0s3
   #:                       TYPE NAME                    SIZE       IDENTIFIER
   #:                       TYPE NAME                    SIZE       IDENTIFIER
   1:             Windows_FAT_32 NO NAME                 15.9 GB    disk2s1

Enter your choice here (e.g. 'disk1s1'): disk2s1
It is your own responsibility to ensure there is no data loss! Please backup your system before imaging
You should also ensure you agree with the Raspbmc License Agreeement
Are you sure you want to install Raspbmc to '/dev/disk2s1' and accept the license agreement? [y/N] y
Downloading, please be patient...
Downloaded 6.49 of 6.49 MiB (100.00%)

Unmounting the drive in preparation for writing...
Unmount of all volumes on disk2 was successful
Please wait while Raspbmc is installed to your SD card...
(This may take some time and no progress will be reported until it has finished.)
0+1172 records in
0+1172 records out
76800000 bytes transferred in 5.425283 secs (14155943 bytes/sec)
Installation complete.
Finalising SD card, please wait...
Volume failed to eject

Raspbmc is now ready to finish setup on your Pi, please insert the
SD card with an active internet connection
If you want to install to a USB device, mount the fat partition and create a file called 'usb'
$
What's next? Put the SD Card in the Raspberry Pi, plug the network, a keyboard, a screen and finally plug the power adapter to turn the Raspberry Pi on!
Raspbmc will download the latest version and install it. This step takes a while (~70 min for downloading the root filesystem then ~15 minutes more for installation and other stuff).
Configuration
All the necessary documentation is available on Raspbmc wiki.
Connect to Raspberry Pi with SSH
Find out the IP address of your Raspberry Pi: in XBMC go to System/System Info/Network.
Then connect with username pi and password raspberry:
$ sudo pi@192.168.1.42
Use public key instead of password to connect. Copy your own SSH public key to the Pi:
$ scp ~/.ssh/id_rsa.pub pi@192.168.42.16:/home/pi/.ssh/authorized_keys
Forbid SSH connection using passwords… Didn't found the option. The SSH server is dropbear and according to dropbear man page adding -w -s -g as arguments should do the trick. I tried to put that in /etc/xinet.d/ssh and /etc/default/dropbear but none of them seems to work.
Some tweaking
- First of all, install my favorite packages:
$ sudo apt-get install emacs23-nox htop
- Change default password:
$ sudo passwd pi
- Turn off unnecessary services (FTP server, SMB server) by setting
disabletoyesin/etc/xinetd.d/ftpand/etc/xinetd.d/samba.
Mouting remote shared drives through SSH
I ripped my DVDs and put them on my local server (a Fit-PC2). They are shared through AFP so I can read them from my Mac.
But instead of installing an AFP client on the Raspberry Pi, I decided to go with SSHFS, which simply allows to mount remote directories through SSH.
SSHFS installation and test:
| |
- Line 1: normal installation.
- Line 2: allow the user
pito usefuseby putting it in thefusegroup, you must logout and login again to have this change taken into account. - Line 3: create the directory where the remote directory will be mounted.
- Line 4: mount it!
- Line 5: check that everything is there.
Note that SSHFS is CPU intensive. I tried to set arcfour as cipher and disabling compression but it didn't improve the CPU consumption much.
Now, let mount that automatically at boot time. Add the following line to /etc/fstab:
sshfs#user@server:/path/to/dvds/ /home/pi/dvds/ fuse defaults,nonempty,allow_other 0 0
Again, using public key authentication will prevent annoying passwords to be asked:
| |
- Line 1: switch to the
rootuser. - Line 2: generate an SSH key pair.
- Line 3: copy the public key to the server.
- Line 4: connect to the server.
- Line 5: add the public key to authorized keys.
- Line 6: logout from the server.
- Line 7: logout from the
rootuser.
After rebooting the Raspberry Pi the directory should be properly mounted.
Note: see comments for updates.
Video codec licenses
Raspberry Pi GPU is able to decode various common video codecs that are also covered by a shit load of patents. Putting the chip in the Raspberry Pi is one thing, being allowed to use the hardware acceleration for video decoding requires to pay royalties first. The Raspberry Pi is a cheap computer, so they paid for the most use codec nowadays: MPEG4.
Since I want to use the Raspberry Pi to read my DVDs, I need it to decode MPEG2 also. The GPU is able to do so but I need the license.
MPEG2 license can be bought on the Raspberry Pi Store. But first, since each license key is linked to a specific Raspberry, I need to find the Raspberry Pi serial number:
$ cat /proc/cpuinfo
Processor : ARMv6-compatible processor rev 7 (v6l)
BogoMIPS  : 531.66
Features  : swp half thumb fastmult vfp edsp java tls
CPU implementer : 0x41
CPU architecture: 7
CPU variant  : 0x0
CPU part  : 0xb76
CPU revision : 7

Hardware  : BCM2708
Revision  : 000f
Serial    : 0000000000000001
Serial is on the last line. Just need to copy/paste that into the Raspberry Pi Store. The license key will be sent by email withing 72 hours (it took about 2 hours for me).
Copy the key into XBMC in Programs/Raspbmc Settings/System Configuration/MPEG2 codec license, then Raspbmc will ask you to reboot. After reboot, run the following command to know if the license was properly activated:
$ vcgencmd codec_enabled MPG2
MPG2=enabled
The best way to check anyway is to play a MPEG2 encoded video.
Issues
The main issue I encountered with the Raspberry Pi for now is related to the USB part. It looks like the USB controller driver is badly bugged. The impact I saw is a very unreliable typing experience with the keyboard, slow network connection from time to time, disconnected keyboard…
Otherwise, the XBMC user interface is a bit slow, but that's still usable. Raspbmc has an overclocking option I haven't tried yet.


Protecting your Raspbmc.
Thanks for your experiences with installing and tweaking raspbmc on the RPi.
I've been trying to protect my RPi with Raspbmc against hacking attempts through ssh. Unfortunately I ran into the same problem you describe; I can't seem to configure dropbear to allow only certain IP numbers. That's the method I tried. I've installed denyhosts, but that only seems to work with sshd. It should be possible to replace dropbear with sshd, but I would not know how to go about doing so.
Did you make any progress on the issue already?
I haven't tried more. As you said, replacing
dropbearwithOpenSSHmight be the solution. Have you tried something likesudo apt-get install openssh-server?Maybe an other solution would be to install and configure
iptables.Update
Some stuff explained in this post are not working anymore with Raspbmc Final.
Automounting remote shared drives through SSHFS
Automounting does not work anymore, so let disable it from
/etc/fstabby adding thenoautooption:sshfs#user@server:/path/to/dvds/ /home/pi/dvds/ fuse defaults,nonempty,allow_other,noauto 0 0Now we need to create an
initfile (/etc/init/mount-sshfs.conffor instance) that will run themountcommand when network is enabled:After rebooting your Pi the
/home/pi/dvdsdirectory should be properly mounted.